")

I’ve been eyeing these suitcase chests on Pinterest for some time. I don’t know who came up with the concept, but I thought it was an awesome idea. So much so, that I’ve been looking for the right chest to make this for some time. So when I found this chest, I knew it would be perfect and couldn’t wait to DIY a suitcase chest! Granted, it was an ugly green. But that just sets the stage for this amazing make-over!
Here are the supplies I rounded up:
-
TSP Degreaser
-
paper towels
-
sander or 220 grit sand paper
-
Coal Black
-
Homestead Blue
-
Mustard
-
Cranberry
-
Bayberry
-
Twilight Geranium (now retired)
-
Plaster
-
Raw Silk
-
Linen (now retired) or Lichen
-
Chocolate
-
assorted suitcase hardware from Amazon and Ebay
-
Grain Stripe stencil
-
Frog Tape
-
IOD Distress stamp
-
Brayer
-
IOD Trimmings 2 mould
-
IOD Air Dry Clay
-
Tacky Glue
-
Cappuccino Stain and Finishing Oil
-
Black Sharpie marker
-
Matte Tough Coat
-
Spray Lacquer
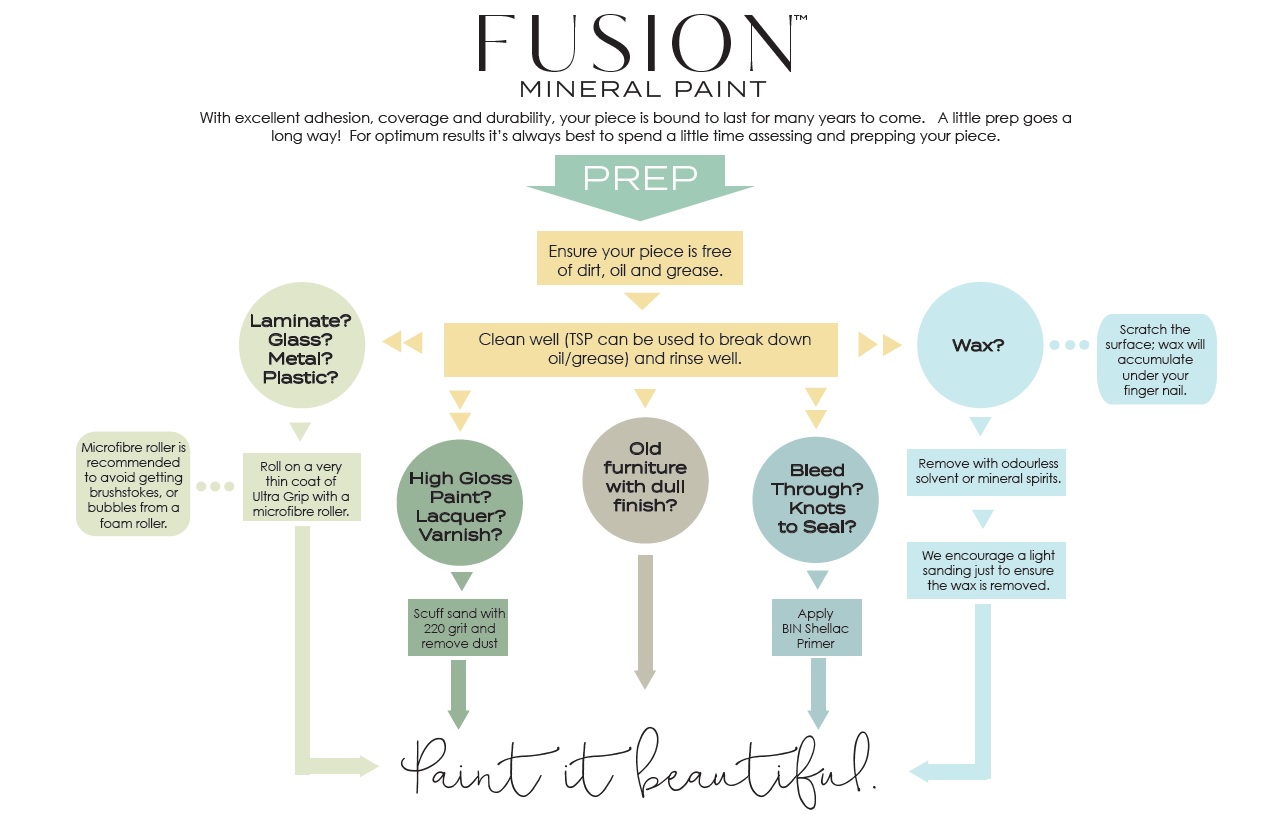
With any furniture project, I always begin be cleaning and degreasing. I use Fusion Mineral Paint’s TSP. It is a concentrate so one bottle makes more than 30 spray bottles of cleaner for me. I spritz it on and wipe. Repeat until the paper towel is clean.


Prior to painting, I sanded the box and drawers with 180 grit on my orbital sander. The old paint had chipped and I wanted a smooth surface for the paint. If your surface is sound, a quick scuff sand with 220 grit is all you need.
I spent quite a bit of time looking a photos of vintage suitcases. I wanted to develop a plan so that each suitcase was unique. I came up with my color palate and started off by painting each drawer. Here are the colors from top to bottom: Homestead Blue, Mustard, Bayberry, Cranberry, and Twilight Geranium. Each drawer got two coats of color. I painted the box in Coal Black.


One of the great things about vintage luggage is the stripes! Stripes were going to be a must-have on these drawers. I used the Medium Grain Stripe stencil for all of the stripes. On the Homestead Blue drawer I mixed a bit of Raw Silk into the blue paint to get a lighter shade and used that to stencil just the skinny lines.
On the Mustard drawer, I stenciled on skinny line and the middle line, then moved the stencil over to double the size of the middle line before stenciling the other skinny line. These stripes were done in Cranberry.
And for the Cranberry drawer, I used the stencil as is and stenciled in Plaster.
I found that putting a piece of tape across the stencil just below the bottom of the drawer helped to hold the stencil stripes in place while I stenciled the stripes. I like to use a makeup sponge to stencil with. You can also use a stencil brush. The secret is to use very little paint and plan on laying down 2-3 layers of paint to get full coverage. Be sure to measure so the stripes are where you want them to be.


My goal was for the suitcases to look warn and vintage so I needed a way to give them a distressed look. Enter Iron Orchid Designs “Distressed” stamp. I put some Chocolate paint onto a palate, loaded my brayer, and rolled the paint onto the stamp. I find the brayer is the best way to stamp with paint. I used a light touch on several spots on the drawers to make it look like the luggage had been scuffed up. It worked!


Then to take it to the next level, I decided to wipe the drawers down with Cappuccino Stain and Finishing Oil. Some of the drawers I brushed the stain on with the grain. Others I brushed across the grain. Brush on and then wipe off what you don’t want.


I noticed in my research that some luggage had decorative straps that went across the end of the suitcase. I knew I could mimic that look with the IOD Trimmings 2 mould and some IOD Air Dry Clay.
I started by dusting the mould with a bit of corn starch to help the clay release from the mould. Then I kneaded and rolled some clay into a long strip and pressed it into the mould. To remove the excess clay, I used a blade (you could use an old gift card) and scraped off the excess clay, then popped the trim out of the mould. I made two of these.
I let them sit for a few minutes on a flat surface so the clay could begin to dry. I decided to paint them Linen for a slight contrast to the Bayberry drawer. Linen has been retired but Lichen or Bedford would be good alternatives.
Once the trim had dried a bit, I painted it and let the paint dry for a few more minutes before using Tacky Glue to glue the two trims onto the drawer. I kept my yardstick handy so I could ensure the trims were placed the same distance from the edge. Because the clay was still damp, I gently pressed it to wrap a bit around the top and bottom of the drawer.


To this point, I’d been working on five drawers. I had saved one drawer for a different look. I felt like I couldn’t make a set of vintage luggage without having one with alligator skin.
I found the perfect paper with alligator skin printed on gift wrap from Zazzle. It is a thick gift wrap and if I were to do it again, I’d use one of their alligator skin tissue papers. If you use tissue paper, be sure to paint a basecoat under it as that will show through the thinner paper.
To decoupage the paper, I put on three coats of Mod Podge. I knew the thicker paper would need a heavy duty adhesive. Once the glue had dried, I used the iron on method to decoupage the paper onto the drawer. Place the paper on the dry glue, cover with a piece of parchment paper, and iron with high, dry heat. The heat reactivates the glue and bonds it to the paper with little to no bubbles. I wrapped the paper around the edges of the drawer and glued in place to ensure it would stay in place.
I knew I needed to seal the paper to protect it. Adding a water based poly over it would only cause it to wrinkle and bubble. So I sprayed it with two coats of lacquer. Once those had dried, I wiped on two thin coats of Tough Coat.


Now these drawers were beginning to look like suitcases but they were crying out for hardware. Before I could attach hardware, I needed to indicate the separation between the lid and the case. I used my yardstick to measure 2-3″ down from the top, marked the measurement on each end, and the connected the marks using a black Sharpie marker and the straight edge of my yardstick.

Once all the hardware was attache, I had once last thing to do. Travel stickers!
I remember as a kid I used to buy stickers from the truck stops as we traveled on vacation and I added those to my luggage. I found some travel sticker images on Etsy and printed those off on sticker paper. When I stuck them to the suitcase, they curled up. So I used Tacky Glue to glue back down. Once the glue had dried, I put a drop or two of Tough Coat on a sponge brush and wiped it over the stickers to seal them. I tried not to get it on the paint because I didn’t want a different sheen.
Those stickers were the perfect finishing touch!

Now that the drawers were done, I realized I still wasn’t finished. This travel-themed chest wouldn’t be complete without drawer liner. I used the same iron-on decoupage method to decoupage vintage street maps in the drawers! Perfection!

I am crazy in love with how this turned out! It was a fun and different creative process and I love that I had a chance to use a variety of mediums to create it.
So let me know if you have questions or I can help you with the process!
Cyndi
Full disclosure. Some of the links in this post are liked to my Amazon store . As an Amazon Associate I earn from qualifying purchases.


Ou are sooo creative, Cyndi! Thanks for sharing your time and knowledge with us!
Well thank you, Sandy! It sure was fun to do!
Gorgeous! I would love to know where you found your hardware bits and bobs.
I found them on Amazon and Ebay. I ordered two different sets of handles and three different sets of latches and then mixed and matched.