")

Ever have a piece resist your efforts every step of the way? Yeah, this one didn’t want to go down without a fight! This is the story of a tired mid century desk and the MULTIPLE efforts it took to bring her new life.
Meet Mid Century. She was old and worn and had evidence of abuse. But oh those legs! I just knew there was life left and decided that decoupaging the drawers would be the perfect technique.

Like every other project, this one began with a good cleaning. I used Fusion’s TSP to remove years of grit and grime. Because the finish was worn, I didn’t need to worry about sanding the finish. I started by flipping her on her head and taping off the legs so I could repaint the gold tips. I love using Rustoleum’s Bright Coat Gold spray paint when I want the perfect bright metallic gold. A couple of coats and she was ready to dance!

She was now ready for a fresh coat of paint. I picked Fusion’s Seaside to coordinate with the paper I chose for the drawers. I wanted a slick, smooth finish so I applied it with a microfiber roller. The best way to keep from getting roller texture is to use the knock down technique, rolling a thin layer of paint and then gently dragging a brush across the rolled path to “knock down” the texture. I love using the large flat Ultimate One Staalmeester brush for this technique!


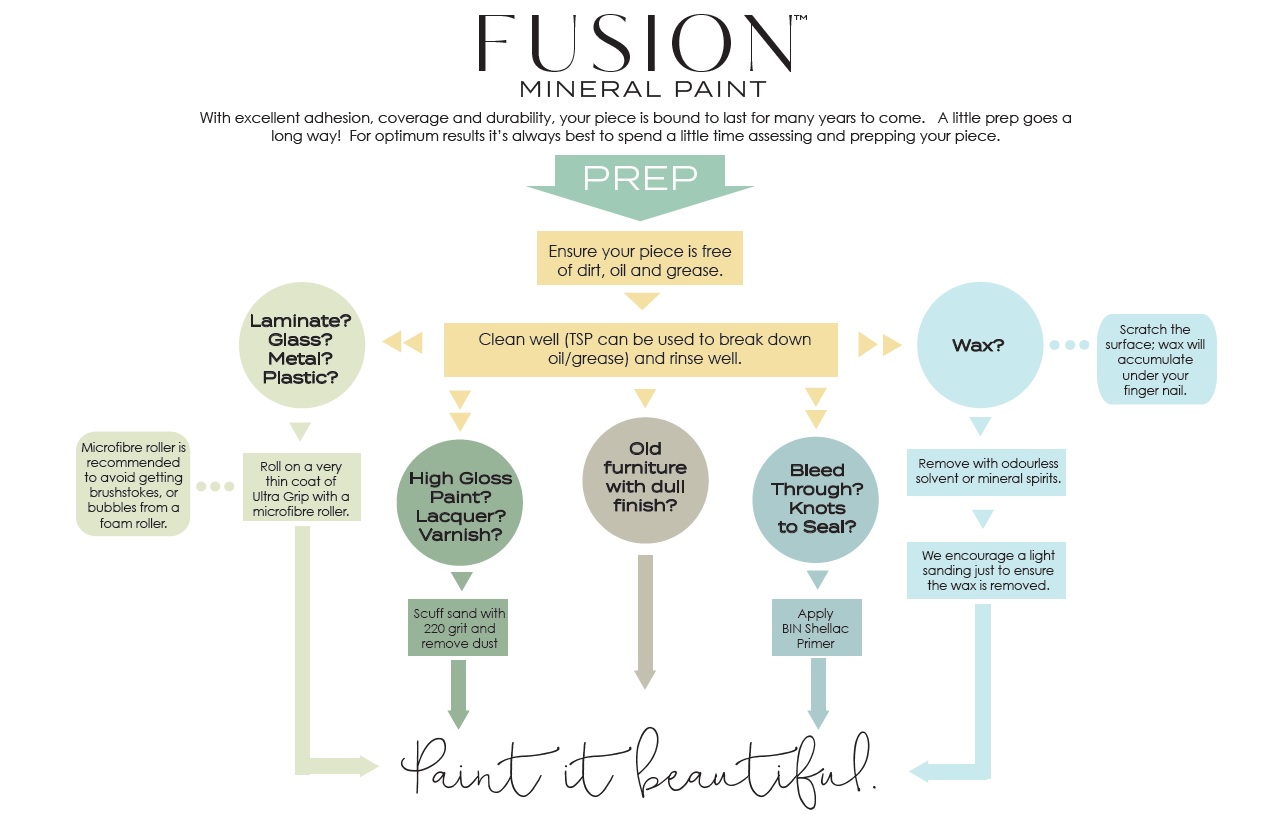
That’s when I hit my first roadblock. When I started to paint my second coat of paint, I noticed that I had bleed through! Didn’t expect that! But, it was an old piece and it was oak so I shouldn’t have been surprised. The only thing that will block the bleed through is shellac. Typically we recommend Zinsser Bin to address bleed through but I didn’t have any and wasn’t making a hardware store run #corona, so I used Bullseye Shellac that I had on hand. I sprayed on two light coats. Shellac dries fast and I was then ready to keep painting.


With two coats of paint in place, she needed a high gloss finish appropriate for her generation. I applied two light coats of Fusion’s new Gloss Tough Coat with an applicator pad. So pretty!

With the body painted it was time to turn my attention to the drawers. I planned to decoupage some gift wrap onto the drawers using the iron method. I had used that technique several times in the past and felt comfortable with the process.
Enter problem #2. I applied two thin coats of Fusion’s Transfer Gel on the drawer fronts, let it dry, and ironed on my paper. It looked gorgeous! Just what I wanted. I needed to give the paper some protection so I wiped on a coat of Tough Coat. I knew the water based product would cause the paper to bubble and wrinkle, but past experience told me that all I’d have to do was iron it back out once the Tough Coat dried. I ironed. It didn’t iron out! Not gonna lie. I cried! So I peeled off the paper and sanded back the paper remnants and glue. I had to buy ANOTHER roll of gift wrap! When it arrived I set out with attempt number two.
Enter problem #3. This time I applied thicker layers of Transfer Gel. I ironed on the paper and it was a hot mess. Not only did I have wrinkles and bubbles, I had bleed through that turned my paper pink! My husband said to just paint the drawers. But I wasn’t going to give up that easily. So, I stripped off the layers of gel, applied a layer of shellac to the drawers, and decided to try a different approach.
Finally, a solution! I changed strategies. I’d heard of people getting great results using Ultra Grip with the iron method for decoupage so I thought I’d give it one more try. I used a sponge brush to wipe on two light layers of Ultra Grip. I thought that maybe one reason I’d had such issues is that the gift wrap was high quality and thick! All of the other decoupage I’d done was with tissue paper and napkins. This was a thick, glossy paper. So, I grabbed a sanding sponge and lightly sanded the back of the paper. I was hoping that would give the Ultra Grip something to grab on to. When the Ultra Grip was dry, I used a hot, dry iron to iron the paper in place. I used parchment paper to protect my iron from the stray Ultra Grip. Perfection!!

Now, I’ve learned from my mistake. No water based top coat for me this time! I opted for spray Varnish. It won’t yellow so it was a great choice over my white paper. I used Watkins spray varnish but any brand would probably do. I gave the drawers three light coats and then attached the hardware. I finished her off by lining the drawers in the same paper. Now, she’s just perfect!


She fought me every step of the way but I refused to give up and it was so worth it! The hard fought battles are the most rewarding and the lessons learned along the way are invaluable. I wouldn’t trade this flip for anything!

This post contains links to my Amazon store. As an Amazon Associate I earn from qualifying purchases. You pay the same great low Amazon price!

I enjoyed reading your blog on this piece. You have inspired me to try decoupage! I will give it a try by learning from your errors.
Love the Fusion colors you chose!
That’s the whole idea! Learn from my mistakes!! You can do it!!